 Note: Only users with access to the Projetex Server Administrator can add or remove custom fields. See the Custom Fields topic for details.
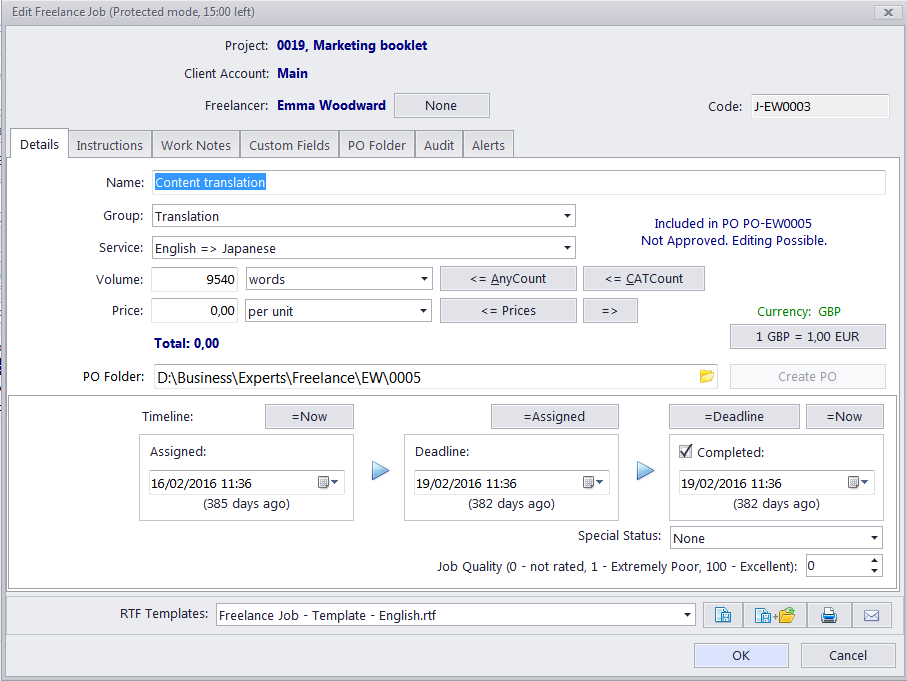
The New/Edit Freelance Job window contains the following data:
Code — the unique job code is created automatically along with the job itself. The first character "J" indicates that this is a job code, the letters afterwards can be either VACANT (meaning that no expert has been assigned to the job) or represent the assigned freelancer code. The number is the value of the job counter for the assigned freelancer. Each freelancer has an independent counter for this code. If freelance jobs are reassigned to a different freelancer, their codes (both the letters and the counter) change accordingly.
Freelancer — freelance experts can be assigned and reassigned at will as long as this freelance job is not included in a purchase order. Freelance jobs must be removed from purchase orders before freelancer reassignment.
Name — this name does not need to include the language pair or service name, since that data is being added separately. By default, this is the name of the parent client job. A freelance job's name can be 100 characters long maximum.
Group — the group of services. All services in Projetex are broken into groups. You can select any of the groups of services available. To add or edit a group of services, open Corporate Settings in the Backstage view, and select the Groups of Services section.
Service — each group of services contains a separate list of services. Before selecting a service, select the group of services first. To add or edit a service, open Corporate Settings in the Backstage view, and select the Services section.
Volume — the job volume can be indicated in a number of units (characters, words, lines, hours and so on). To add custom units, open Corporate Settings in the Backstage view, and select the Volume Units section.
You can also use the built-in AnyCount or CATCount tools to quickly count the job file, or calculate CAT text volumes (100% match, fuzzy match, and so on). You can also import Trados and Logoport logs with the help of the CATCount tool to quickly enter the required volume. See the AnyCount in Projetex and CATCount in Projetex topics for details.
Price — the price can be entered manually or copied from the freelancer's individual price-list. To copy a price from the price-list click the <=Price button. The price for a matching service, group of services and unit combination will be copied. Click the => button to copy the price to this freelancer's price list. You can set a fixed price for the freelance job (which will not be multiplied by job volume) by selecting the flat fee option in the drop-down list next to the price field. Select the free option in the same drop-down list to set the job total to zero. The price and volume in free job must not necessarily be zero.
If the freelance currency differs from your base currency, the Currency Exchange Rate button will be available. By clicking this button, you may change the currency exchange rate used in this job. Note that this button does not change the general exchange rate stored in your Projetex database. To change the exchange rate for all future jobs go to the Exchange Rates tab of the Corporate Settings.
PO Folder — purchase order folders contain all files the freelancer would need to begin working on the job. When creating or editing freelance jobs it is often necessary to work with job files (for example, you may need to copy the name of the file or count a job file for it's exact volume).
Before creating a PO folder, create a purchase order itself by clicking the Create PO button. This will create a purchase order containing this freelance job, or add this job to an existing PO, if there are any. See Creating Purchase Orders for more details on POs.
Once a purchase order has been created, the PO Folder tab becomes available. This tab can be used to access the PO folder without opening any additional windows. Also, the PO Folder tab can be used to quickly find and access a number of folders related to this job, like the project folder, the client's FTP folder and the JA folders of other JAs in this project.
Timeline — the timeline of a freelance job in Projetex includes the assigned and deadline dates, as well as the date when the freelance job has been actually completed. The Deadline and Completed values are taken into account when the program determines the status of freelance jobs (like due today, overdue and so on).
You can use the buttons above the corresponding date fields to quickly set the assignment date to the current date, the deadline to the assignment date, or the completion date to the deadline or the current date.
To mark a job as completed, click the Timeline button and select the Completed check box.
Job Quality — the job quality rating allows you to evaluate the quality of freelance jobs. It may contain any ratings from 1 to 100. Job Quality can be displayed when you search for freelancers using the Search function. The Search button is located on the Main tab of the Freelancer window and on the Freelance Team Tab of the Project Window.
Special Status — these are used when a job needs to be put on hold, when you create heads-up (or potential) jobs, or when you need to cancel a job. Jobs with the on hold status have their deadlines undetermined, thus on hold jobs cannot become overdue. Jobs with the heads-up status cannot be set as completed, since the status assumes that work has not yet started. Canceled jobs also can not be set as completed, since the status assumes that the job was abandoned.
Instructions — any instructions (like terminology to use) regarding a freelance job can be entered here in the form of a plain text note.
Work Notes — staff notes can be entered here.
Custom Fields — freelance job information can be customized by adding custom fields for additional information not foreseen by the default controls.
Note: Only users with access to the Projetex Server Administrator can add or remove custom fields. See the Custom Fields topic for details.
Audit — keeps track of when and by whom the job was modified.
Alerts — keeps track of messages received from the Projetex 3D Automation Engine.
You can save freelance job data in a printable file, print it, or E-mail it with the help of RTF templates.
Templates for printing freelance jobs can be edited via the Corporate Settings in the Backstage view. Click the Templates section to quickly access all template folders. Templates for printing freelance jobs are saved in the \...\Business\Templates\EXPERTS\FREELANCE\Jobs folder.

See also:
Freelance Job Template Variables
Saving Printing and E-Mailing Projects and Jobs